Once upon a time, there was a small town in Texas. In that small town was a small part of a big Church. This Church asked it's members to love one another and share with one another. This Church also asked its members to store large amounts of wheat, so much wheat, in fact, that the women of the Church decided that they would shun the white flour sold on the shelves of the small town, and use that wheat to grind into flour and make their own bread. From scratch. Like real pioneer Church-lady-type-people. And each of the women made their bread and the people...they were HAPPY.
Then one day, the men decided that they too, could make the bread. One good brother said to another good brother, "Have no fear, Brother, I will show you how to make the bread". And the wives snickered. (No...not really...but it makes for a good story) Each wife, being a good pioneer Church-lady-type-person, armed her husband with her best bread recipe as she kissed him on the cheek and sent him off to war the happy event.
SO the men met and they made the bread. Such grinding of wheat and kneading of dough had not been seen before in the small town, and the Church folk anxiously awaited the outcome. When the loaves emerged, they were golden, aromatic works of art, each moist and delicious, yet different from each other. One brother's bread was simple, rustic, and required few ingredients. The other brother's bread was a symphony of grains and adaptability. As men-folk are wont to do, the two men merrily clapped one another on the back and went out into the garage to discuss how to build a faster Pine-wood Derby car. But the women stayed behind. They poked the bread, they smelled the bread and they politely tasted the bread. Each of the women secretly decided that her husband had indeed baked the better loaf of bread.
From that day forward, the families of the two women baked the bread for the people in the Church. Whenever there was a new member, a sickness, a baby born or a cheering up needed, they would run to their kitchens, and bake their special bread. Then, while the pans were yet warm, they would wrap the loaves up and throw them into their mini-vans (OK, it was a gigantic blue 15 passenger van and a Suburban...it was the 90's...), burn rubber out of their driveways and race to the home of the person in need. When the people tasted the bread, they always asked for the recipe, because they had never tasted such remarkable bread.
To this day, each Sister will declare the wonderful qualities of the other's bread, but she'll ALSO tell you why she loves her own bread better. Through the years, many people have been the recipient of a loaf from each sister, (these sisters really know the meaning of service!) and all agree: Both of the recipe's are wonderful. And no one will admit to using one recipe over the other. So...without any further ado, I give you the two recipe's, made famous by the showdown. (Unfortunately, my own notes are included...since I've long since forgotten where the recipe ends and my notes begin) ***In the interest of full disclosure, I took extreme creative liberty with the story. Sandy's exact words were "I would probably drop over dead if Robert ever made bread, but who knows, maybe if I have 7 more kids..." And if I'm not mistaken, the Payne's bread is a family recipe. Anyhow, it made a good story and no matter what, they both make a dadgum good loaf of bread!***
Payne's Brown Bread
5 1/2 cups hot tap water 1 cup of sugar plus 1/2 cup oil OR 1 cup honey 1 1/2 Tbsp salt 3 Tbsp rapid rise yeast, (she says not to use regular Fleishmans, but I do. I'm sorry Kris) 1 Egg (optional Glen says it makes it brown better) Approx 5 lbs flour. Half wheat half white or any combination you like.
Combine water, sugar or honey and a bit of flour. Then add yeast and enough flour to make a batter, then mix for 3 min in mixer. Switch to dough hook and begin combining rest of flour, then knead for 8-10 min. Add salt during last few min of kneading. Turn into bowl and let rise in a warm place for about an hour. Punch down, shape into loaves, let rise again for about 40 min. Cook at 325 for 30 min. or until loaf makes a hollow thump when tapped. You may also skip first rise and just shape into loaves, let rise and then cook. They keep the crust nice and soft by buttering while still hot and placing loaves in paper bags.
Sandy Johnson's Bread
6 cups hot water 2 Tbsp yeast 2 Tbsp salt 2 eggs 2/3 cup honey 2/3 cup oil 2/3 cup dry potato flakes 2/3 cup dry milk 1 cup cracked wheat 1 cup oatmeal 1 cup oat bran 8-10 cups flour, white and wheat in some combination.
I also add about 1/2 cup wheat gluten, a handful of flax seed meal, some dry malt and some wheat bran. This recipe is very flexible on what you add for grains. I have never used oat bran in it, I use 10 grain cereal though! The less wheat flour you use, the less the bread will rise. So you need to keep your non-wheat grains around three cups of the total amount of wheat to ensure a good rising bread. Follow basic method above to assemble ingredients. Sandy's cooking directions are to cook at 400 for 15 min and then 350 for 30 min.
I've developed a new obsession: soap. I have a few friends that come over on Tuesdays. We let the kids run wild and we make soap while we chat about life and love.
But I'm not going to cover that today.
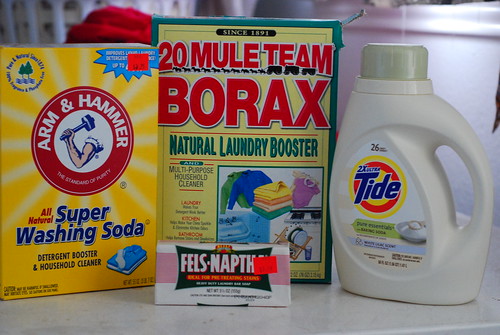
Lets start easy on you and show you how to make your own laundry soap. This is an INCREDIBLE way to save some money. Here's what you need:
I spent: $3.39 for Borax, $2.49 for Super Washing Soda and $1.19 for Fels Naptha soap. More on that as we progress...
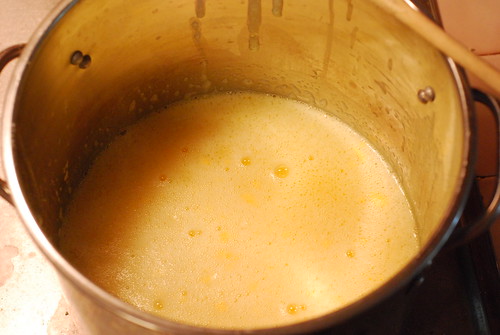
So the first thing I did was grate the soap and add it to 8 cups of water and heated it:
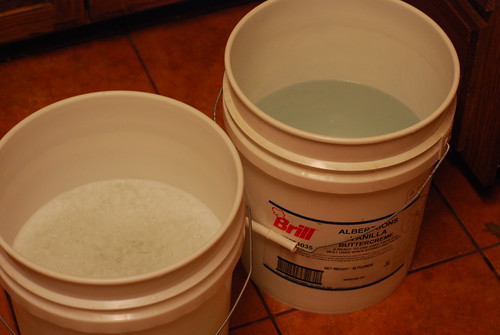
While that was heating I put 3 gallons of hot tap water into each of two five gallon buckets...so 6 gallons of water between two buckets. I did this because I doubled the recipe...I'm still not quite sure WHY I doubled the recipe, but I did...so lets just go with it. OK? OK.
To the three gallons of hot water, I added one cup of washing soda...and stirred it up to disolve it. Since I doubled, I did it twice. Here's what my buckets looked like. The one on the right has some suds because the residue from my last batch was still in there:
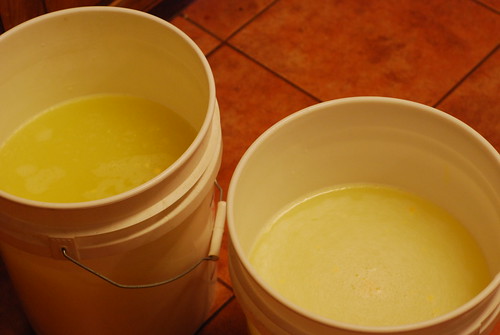
To the soap and water mixture on the stove, I added two cups of Borax and stirred. The mixture got slightly thick. Then, I poured off four cups of the Borax/Soap/Water mixture and added four cups to each five gallon bucket and stirred.
That is what it looked like when I finished. Now, because I love, love, love the smell of Tide White Lilac with Baking Soda, I poured about 4 cap fulls into each bucket so I could capture all that yummy smelly-ness in my home made laundry soap...but that step is completely optional. I'm sure this step probably more than doubles the cost of my laundry soap per load, but lets get back to that and see how much my nicely scented soap is really costing me per load:
I spent right around $7 for supplies. Of that, I only used 2 cups each of the Soda and the Borax. Now, just for arguments sake, lets say there is six cups in each the Soda and the Borax boxes, so each 2 cups costs me .57 for the Borax and .42 for the Soda. The Fels Naptha costs $1.19 and I used the whole bar for a double batch. So total, I spent $2.18 to make just over 8 gallons of laundry soap. That translates to approximatly 128 cups of laundry soap. If you divide the $2.18 out over 128 cups, that translates to just under .02 per load...if you use a whole cup instead of the half cup you could probably get by with.
NOW. I spent $3.99 on my Tide using coupons and a sale, and just to make it easy, lets say I used the whole thing in there, ( I didn't) which makes the whole batch cost $6.17. Without adding any additional cups of volume created by adding the detergent, this would mean each load would cost .05. To contrast, the same $3.99 I spent on the Tide, if used alone, would wash 26 loads, which translates to about .15 per load! And remember, I used coupons! If I didn't use coupons and was just lucky enough to find it on sale, it would cost $4.99 which translates to approximately .19 per load!
The whole thing took me about 15 minutes and now I have enough soap to last until the second coming...or until we go camping...all for right around $6. Does it work? You bet. Even the nasty smelly laundry comes out fresh and clean and everything looks at least as good as it did using the commercial stuff at full strength. Give it a try! You'll feel so proud of yourself for being super duper thrifty!
Here's the original recipe: 1 cup Borax 1 Cup Super Washing Soda 1/2 bar Fels Naptha Laundry Bar or 1 bar Ivory soap
Grate soap and add to 4 cups of water you've heated on the stove. Add three gallons of hot tap water to a five gallon bucket. Dissolve 1 cup of Super Washing Soda in the 3 gallons hot tap water. After soap has melted in hot water on stove, add 1 cup Borax and stir to dissolve. Mixture will get thick. Pour thickened Borax/Soap mixture into the soda water and mix to combine. Add whatever fragrance you'd like...or don't. You are supposed to let the finished product sit for 24 hours after mixing...it will thicken some and be more gel like in appearance. I pour mine into my old detergent bottles for easy dispensing.
Yeah, this little nugget was important enough for me to drag myself off my death bed to share with you.
I've been suffering some insidious sort of illness involving sweats and chills and headaches, body aches, and a sore throat, OH! The sore throat. My favorite all time sick food is Cream of Wheat, easy on the throat, nutritious, warm, goes down easy and heaven-forbid, back up easy if the need arises...all the good things comfort food should be.
So I trudged my way to the pantry this morning in search of some COW goodness since I was going to have to take my vitamins and not eating again was not going to be an option. To my horror, I discovered that my stash was *gone*. Cream of Wheat is not one of those foods that I stock up on regularly. I literally bought a box this past summer to replace the box I brought with us from WY...nearly 7 years ago. *Groan* Why didn't I buy two boxes? I asked myself. Oh yeah, because the stuff costs nearly $5 a box, that's why.
I briefly considered throwing some whole wheat flour in a bowl with some milk and just going for it, but a goopy flour gruel didn't sound like the comfort food I craved. So I turned to my super google skillz and discovered a post on some site, which I can't even remember through the haze of my cold meds, and the woman used hard red wheat and the coarse setting on the Nutra-mill grinder to make homemade Cream of Wheat. So I gave it a whirl. I am here to tell you it works like a charm and I am here to tell you we are in the WRONG business people!!! $5 a box is like HIGHWAY ROBBERY!!! You can make your own homemade Cream of Wheat cereal for pennies. Here's what you do:
Take a few cups of hard red wheat...couldn't tell you how much I used...remember...cold meds. Dump in the Nutra-mill. Crank mill setting to the far right...that would be counter clockwise if you too are in a haze and can't read the "coarse" setting. Take out the grainy floury looking substance and store it. To prepare the cereal: Mix 2/3 cup milk, or water, or milk and water with 1/3 cup of the grainy floury stuff, and cook it. Stove top or microwave..your choice. The lady in the post claims she cooked hers for 20 minutes...I could never have cooked mine that long. I did a few minutes on the stove, until it boiled over, made a mess and sent a stench into the air. Then I started over and tried 1:30 in the microwave, gave it a stir and put it back in for a minute more and perfection. I like mine thick, with ice cold milk over the top and white (yes, I know) white sugar on the top.
So there you have it. Homemade Cream of Wheat cereal for just pennies, and so easy a cold medicated sick person can make it. Try it if your kids hate oatmeal!
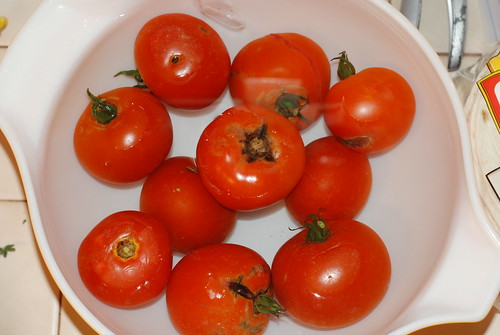
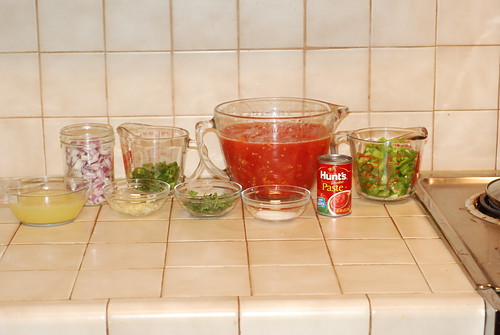
Let's make salsa! The tomatoes are piling up so let's can them. I started with this recipe but I don't have THAT many tomatoes,so I cut it in half...roughly.
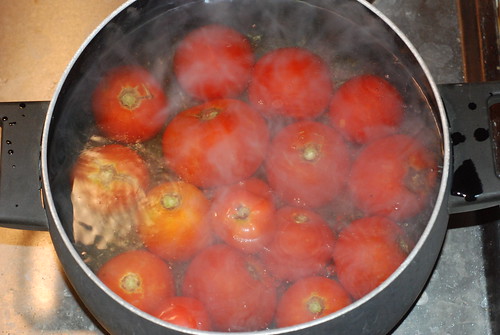
When canning salsa, or making peach jam for that matter, the first thing you have to do is take the skins off. I know it sounds horribly difficult, but I'm gonna show you the easy way. Ready?
That is boiling water. And those are tomatoes...in the boiling water. Just put them in there for about 45 seconds...a bit longer if they aren't super ripe. Then, take them out and put them in ice water like so:
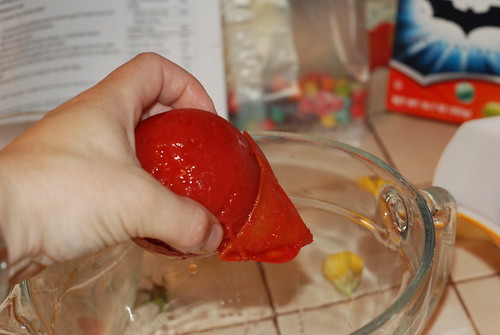
And they will do this:
Once you slip off the skins, you can rough chop them, or do what I did and stick your thumbs in them to drain out most of the seeds and water, then crush them with your hands. I went and did a touch over four cups worth.
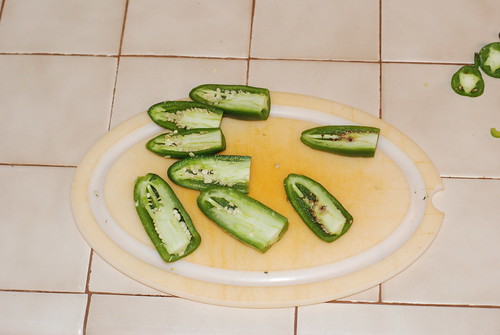
Then you need to cut up your bell pepper and onion. I diced about 2 cups worth of each. Next, you need to cut up your jalapenos. I seed mine first because I don't like hotness that tears the face from the body. So I half them:
And then scoop out the guts with a spoon:
I also cut up my cilantro. The best way to cut up cilantro is with a pair of shears or scissors. Trust me. The recipe calls for three garlic cloves, and since I was cutting the recipe in half, I went ahead and used three cloves of garlic, because I could use a clove and a half of garlic, but why would I? Everything tastes better with lots of garlic.
I also measure by eye. people who watch me cook often comment that they wish they could do that. Wanna see how I do it?
Just like that. Thats about a teaspon. Wanna see it again?
Boom. Just like that. Go ahead, try it sometime!
Or measure it out. Whatever floats your boat.
And finally, when canning salsa, you are canning ingredients like onion, peppers and spices that aren't acidic...and safe canning relies on acid or sugar to keep the bad stuff at bay. Obviously we won't be adding 10 cups of sugar, so we need to up the acidity of our product to ensure that we don't get salmonella and die. Or wish we were dead. The recipe calls for vinegar, but I'm a rebel so I used lemon juice, and since I didn't have quite enough lemon juice from the sad little lemons that were rolling around in the bottom of the crisper drawer, I topped it off with vinegar. Because recipe's are really nothing more than places to start...right? Just not in canning. You should always follow a tested recipe. Don't let me and my evil ways lead you astray.
So, we have all our pretty ingredients:
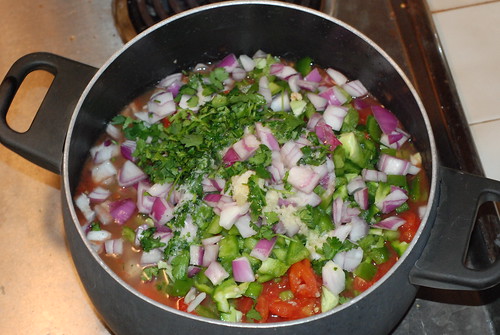
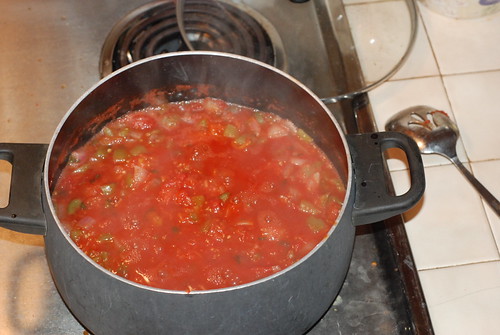
And then you put them in a pot to simmer:
Yes, those are red onions. No particular reason other than it was in the fridge.
My husband says I dirty every dish in the kitchen when I cook. I have no idea what he's talking about.
So then you are supposed to simmer this until it's the consistency you want it...I prefer fresh salsa, so I'll wing it for a while.
Uh. Looks good to me? Add in the tomato paste. It does make it thicker...not sure if I wanted it thicker, but I'll go with it.
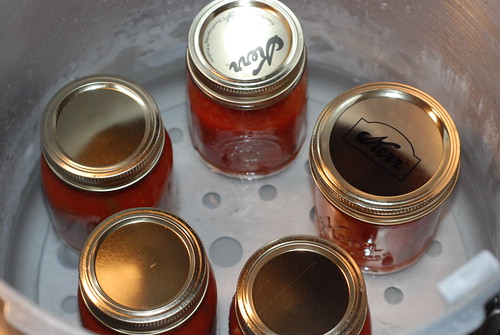
Now from here on out, things should start looking suspiciously familiar. The reason for that is that, canning is canning is canning. You put it in the cans, you screw down the lids, you process, you cool...the only thing that varies is the length of time you process different size jars and products.
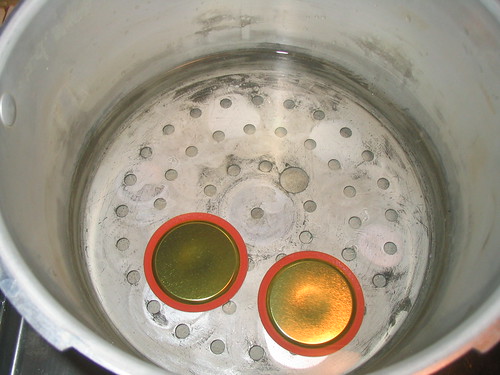
So put them in your jars, leaving some head space..I left an inch since I am going to pressure can these. I could just do a boiling water bath, but that big beautiful pressure canner sitting there with all its stainless steel convinced me to pressure can it. So fill the jars, put on the lids, (finger tight...remember?) put a couple quarts of water in the canner and put your jars inside.
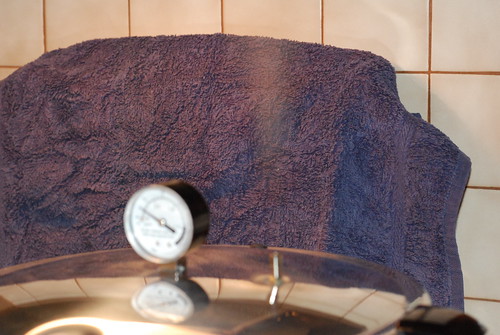
Then put on the lid and crank the heat up until steam comes out the top like so:
See the steam? Let it carry on like that for ten minutes. Then, put on the weight, turn down the heat and let the steam build to 10 pounds if you are below 1000 feet, 15 if you are above 1000 feet. (Altitude...1000 feet altitude) Then keep adjusting your heat to keep it where you need it...if you drop below your pressure, you have to build it back up and start timing all over...so don't do that. We are processing these pint jars of salsa for 15 minutes..because my super Google skillz told me that was the recommended time for pressure canning salsa. It is important that you never leave your canner while processing so you can keep an eye on things. And here I am cooking along at 15 pounds of pressure despite my needing ten pounds because I left the canner.
I guess my Mai Tai distracted me...oh wait. I'm a Mormon. So I guess it was that potty break I took.
Anyhow, let your cans process along and when the time is up, turn off the heat. Let the canner cool down, don't force it and don't let steam out of the vent, just let it do it's thing. Once the pressure is gone, you can open the canner and take out your cans. Make sure they all seal and you'll have some summer in a jar to enjoy this winter! I admit, we cracked one open tonight (it was only part full) and this stuff is pretty durn good.
I got a great tip from my SIL and decided to give it a whirl. She says if you can venison (deer meat) with a hunk of beef fat, it will taste like beef when you open it up. If this works, I'm gonna need a WHOLE lot more cans for all that deer meat I have in the freezer!
I defrosted a bunch of sirloin that Taxi Dad gave us this year, cut into chunks...removing all the fat and connective tissue...I filled pint jars with the deer meat, and put a couple small chunks of beef fat I gleaned off a brisket that I was preparing for smoking on top of the venison. Finally, I added a touch of salt and a little bit of water, screwed on the tops and processed at 10 pounds of pressure for 75 minutes. You can find a detailed account of how to can meat here.
Anyhow, I'm finding that the worst part about canning is that you can't tell how your stuff turned out right away! So I guess I'll wait a while and let you know how it turned out when I open up a jar!
Running behind as usual, but here's the down low on how to stick stuff in mason jars, keep it on your shelf for a year, feed it to your family and not die of botulism.
Whenever I tell people I'm canning stuff, I get told that they are scared of pressure cookers. I promise that the days of exploding canners are in the distant past. If the vents get blocked, modern canners have blow-out valves that will release the pressure, you will not have a bomb going off in your kitchen. Many people are scared to death of canning because they heard a story. For more information and to ease your troubled mind, read this.
Storing food for later use mainly involves stopping spoilage by killing nasty stuff already in your food, keeping micro-organisms away from food with an air-tight seal and/or adding ingredients that inhibit the growth of any nasty stuff that might have made it through your killing efforts. Fruits, jams and jellies can be preserved with a combination of copious amounts of sugar; which keeps stuff from growing in there, heat; to kill bad stuff, and an airtight seal; which can be accomplished without the use of a pressure canner through a process called a "water bath". The process is very basic even though it sounds a little scary. Basically, you make something yummy, like, oh, I don't know...maybe SPICED PEACH JAM or even better, BLACKBERRY PEACH JAM and you make it, following the directions. You can't make jam recipe's more healthy by reducing the amount of sugar!!! I'm all about breaking rules, and I firmly believe that recipes are nothing more than a good place to start, but you must use tried and true recipes for canning. You can vary the kind and amounts of spices in any given recipe, but you must keep the ratio of fruit to sugar the same. In fact, I'm pretty sure when I make Spiced Peach Jam, I use the Blackberry Peach recipe spices instead of what you see there. Anyhow. Today's focus isn't going to be canning fruits and jellies. Lets talk MEAT!
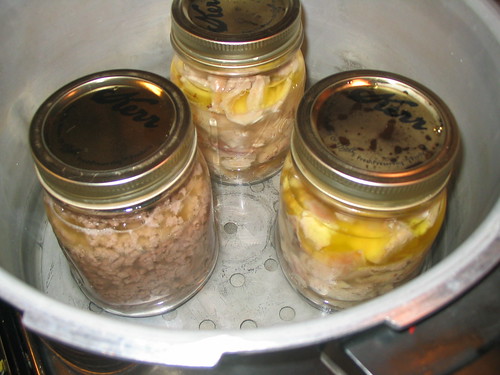
There are a few slight differences in canning with a pressure canner vs. using a water bath, but for the sake of today's discussion, we'll assume you don't know squat about either one. I've canned chicken, ground beef, chicken soup and chili in the past week. Some of the chicken I did was raw pack...as the name implies, it was raw when I packed it in the jars. You can do this because it will cook during the pressure canning step. The ground beef, soups and chili were all cooked. I discovered during my research for this project that you shouldn't can soup with dairy or thickener's in it. They also recommend you not add noodles, barley or rice before canning either.
So here's how to can your own meats and soups:
You need pint and quart sized mason jars. Because you will be canning under pressure, it's not a good idea to use old garage sale jars. Buy your own new from somewhere like Wal-mart or even most grocery stores. If you do get used ones, make sure they are from someone you trust and they aren't ancient. You will be re-using the jars, but never, never try to re-use jars from a commercial packing operation...like a mayonnaise jar; and some old commercial jars look a whole lot like home canning jars. If your mom bought jars and used them for two or three years, then you're probably OK, but we want to stay away from garage sale and DI finds for this project...K?
Jar Prep: No need to sterilize your jars! Which is super nice. Just wash with warm soapy water and dry. I also dropped the lids in some hot water while I prepped the other stuff, just to soften up the seals.
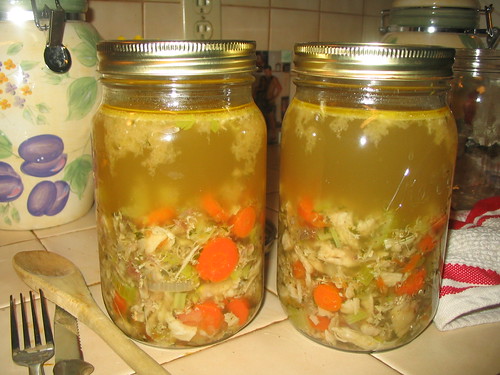
Chicken Soup: I made a nice stock, added some celery, onions, carrot and removed the bones from the chicken I used to make the stock. I then ladled it into quart jars, filling each jar about half full of goodies and the rest of the way with stock. I left about an inch of "head space" at the top of the jars. Head space is the amount of air you leave when filling your jars to allow for expansion during heating. If you don't leave enough, it may allow food to leak out or, I guess, theoretically, it could bust your jars.
Raw Pack Chicken Breast: I found some chicken breast tenders on sale, some I diced, some I left whole. I rinsed the chicken well and packed it into pint jars leaving about 1/2 inch of "head space" at the top. I did my best to squish out the air spaces down in the meat, but I'm pretty sure that's not totally necessary. Last, I sprinkled about a half teaspoon of salt on the chicken. No need to add liquid when raw packing.
Cooked Chicken Thighs: I baked some thighs I found on sale, removed the skin, de-boned and rough chopped. Then I packed it into pint jars and filled each with water and chicken juice from baking, leaving one inch head space. Sprinkled 1/2 tsp salt on top of each.
Ground Beef: This I browned, drained, rinsed and salted. I then packed it into a pint sized jar and added water, leaving one inch head space.
Chili: Made my friends make it. There were two varieties, one of which was from the recipe on the sidebar. We ate what didn't fit into the quart jars we used. It was super tasty!
Once I had the stuff in the jars, I put the warm lids on and put the screw bands on...you want them tight, but not too tight...somewhere between Hercules and Pansy Butt should be just about right.
When you can jelly and jam, you ladle the hot jam into hot, sterilized jars. This process doesn't require the jars or the contents to be hot. I guess you would want to use common sense...like not taking frozen or super cold jars full of stuff and plunking them into boiling water...but you don't have to have everything hot for this process.
Once the jars are packed and the lids screwed down, all that's left is the actual canning...which is what intimidates people but I promise, it's the easiest part. You fill your canner with a couple inches of water and put the rack down in there. The rack is going to keep your jars from sitting on the bottom of the pan and therefore, the direct heat of the element. The water will create steam and pressure which will super heat your food and jars and kill any bad stuff lurking in your food. The cooling is what will create a vacuum inside your jars and seal the lids on for long term storage.
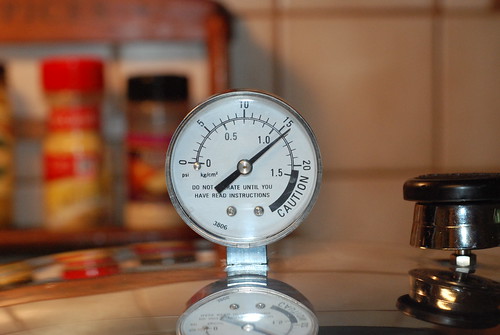
It is important to note that you can't can meat or soups with a pressure COOKER...it must be a pressure CANNER. The best use a metal to metal seal and wing nuts that hold the lid on tight. But there are several other varieties out there that have rubber seals that work just dandy. The main difference between a pressure cooker and a pressure canner is that a canner is capable of building more pressure and there is some form of telling how much pressure is built. The pressure is measured with either a weight or an actual gauge. If your canner has a gauge, you just have to read the dial to tell how much pressure is inside, if there is no gauge, you have to listen for steam rocking the weight, so I shot some video to show you what it should sound like.
So. You've filled your jars, you've screwed on your lids, you've put some water and your rack down in your canner...what's left? Well, you need to put your jars into your canner. Only can one size of jar at a time. You will process pints for 75 minutes and quarts for a whole 90 minutes, so it just wouldn't do to have them all in there at the same time. So put your jars in like so...
and lock the lid down on your canner. Now, turn your heating element on high. Pretty soon, you will see steam spouting out the top of your canner like this:
Steam needs to escape from the canner in this manner for ten minutes. Once the ten minutes is up, you place the weight on the spout. We will be canning at 10 pounds but if you are over 1000 feet in altitude, you need to can at 15 pounds. So, if you have a canner with a gauge, just plunk the weight onto the canner, and once the canner builds ten (or 15) pounds of pressure, you will turn the heat down to keep it at 10 (or 15) pounds on the gauge for the entire length of your processing time: again, 75 minutes for pints, 90 minutes for quarts. DO NOT LEAVE YOUR CANNER UN-ATTENDED. Do not let the canner get under ten pounds of pressure, if you do, you have to get it back up to ten pounds and start timing over again. Better to have a bit too much pressure than too little. If your canner doesn't have a dial-type gauge, you will need to read on. You will still place your weight on there after the steam has escaped for ten minutes. Most canners of this type have a round weight that has 5, 10 and 15 imprinted on the weight and holes at each of these numbers. We are going to use 10 (or 15 if above 1000 feet in altitude) and put that baby on there. Then, it's going to start jiggling like this:
Which is good. Once it starts jiggling, you can start timing (75 minutes for pints, 90 for quarts!) and you are going to reduce the heat until it jiggles like this:
and you are going to listen for and maintain that jiggling pattern throughout your processing time. Once you have processed your cans for the prescribed amount of time, 75 minutes for pints and 90 minutes for quarts...in case you didn't notice before...you turn off the heat. Now you can go do whatever you want...it it safe to leave your canner at this point. You need to let your canner cool down and release pressure all by its self. Try not to cheat. DO NOT run cold water over your canner to force cooling. Don't lift the weight. The canner doesn't have to be stone cold before you open it, but the pressure has be all off before you take off the lid. If you are in a hurry, give it 30-45 minutes and take off the weight. If there's no hissing steam, you can probably take the lid off and remove your jars. You'll want to set your jars on a towel in a draft free place and remember, they are gonna be super hot if you didn't let the canner go all the way to cold before you take them out! A jar lifter is a handy piece of equipment in this case. I also cover my jars with another towel as they cool. You may hear the lids "plink" when they seal. You may not. You do need to check and make sure the lid of each jar has sucked down and is concave in appearance. Incidentally, you should also make sure each jar is still sealed before you consume the contents once you've stored them a while. Write the month and year on the lid before storing with your BFF, the Sharpie marker. And stand back and enjoy your domestic efforts! I know, the whole thing is easier than it sounds, but we won't tell anyone. For additional information or if my directions weren't clear enough, the CSU extension site has a nice page on canning.
One of my friends asked "Can you tell me when you have time if you make things from scratch every night or freeze stuff and heat up? Is it cheaper?"
Well, I almost never have time, but I'll take the time anyway to answer this important question. How is cooking from scratch important to home food storage? Besides being cheaper and thus insuring that you have some extra coin to get a reserve going, it's healthier for you and it will help you eliminate waste and spoilage through rotation.
Yes, I cook from scratch almost every night. When I am not struggling with organization, I also freeze stuff and heat up...but not in the "make a casserole and freeze it" sort of way. What I like doing is buying my meats and immediately upon getting home, I separate them into bags, plop in some kind of marinade (from scratch-hardly ever use bottled stuff) and THEN freeze. To use, I simply remove a bag of marinated goodness from the freezer in the morning, set it on the counter (I know, I'm bad) and then grill or bake for dinner. Add a can of veggies and maybe some potatoes or rice and that's it. Now, being the busy and lazy person that I am, I have to qualify this some: I prefer to do this every time I go to the store, but have to admit I sometimes get lazy on the front end and pay for it when I wish I had something fast to throw together. But I still force myself to defrost something and cook from scratch, why? The answer is simple: economics. We'd have starved to death long ago if I was trying to buy mixes and boxes. Here are some recipes in my personal collection that I use for marinades:
When I have a little extra time, these Stuffed Chicken Cutlets are divine and perfect for individual freezing on a jelly roll pan, then pop the frozen bundles into a big Ziplock for one at a time dispensing.
Yes, I know. We eat a lot of chicken. But we also eat pork when it goes on sale and these recipe's all work well on pork. Marinades are easy! Sometimes, I just start dumping things in. I buy bags of lemons and limes at Sam's and I just go crazy with the spices and oils. Anything you marinade this way will turn out really well because it gets to really penetrate the food since it gets to be in contact with it for so long! I also sear the outsides of roasts and add in my braising liquid prior to freezing for positively delectable pot roasts!
I ALWAYS try to buy in bulk, it's cheaper in the long run, helps us eat healthier foods, and I always have something on hand...somewhere, which means fewer trips to the store. It's a proven fact of marketing that the more time you spend in a store, the more money you spend at the store. I get a whole lot of mileage out of my Sam's Club card and I also frequent a store that sells overstock merchandise and things that are nearing expiration. I can buy 10 yogurt cups for a dollar. I can buy 3 boxes of Bunny Grahams (Annie's Organic) for $1. (reg $3 each) I can buy ground beef for .99 a pound and my kids and I were just thrilled when I got packages of Cheese Dogs for $1 each. The thing with the meats is that they are usually frozen and hamburger is in a 5-7 pound chub. Here are some recipes to use for ground beef:
Salisbury Steak but I make meatballs, then cook, add gravy and freeze. Mini Meatloaves Again, individual freeze and reheat. And of course, I usually keep a big bag of frozen ground beef on hand that has been browned with onion, garlic, salt and pepper. It is a perfect start to about 101 different casseroles, burritos, sloppy joes, and even as a mix in for that wonderful standby: Mac and Cheese.
Now, this is where lots of people start needing to breath into a paper sack, cooking from scratch every night is a lifestyle change. For most, this change will occur gradually as you build your food storage program, so if you are smacking down McD's 3 times a week and Hamburger Helper is your BFF, I want you to consider why you are in this habit. Is it because you simply have nothing on hand and are too tired to make stuff to eat when you get home? Would it help you to have something to serve on short notice, even if you had to micro-defrost it? Would it make you feel less guilt to have something decent to eat without a trip to the store or a drive-thru? I will guarantee that with a small investment of time each week, you can free yourself from pre-packaged, sodium laden boxes and Fat Food Drive-Thru non-food FOREVER. You will feel better, you will look better, and you will be richer...or at least, less poor. ;O)
With just a bit of planning, you can have at least 6 different chicken varieties on hand with only about 30 min invested. Here's what you do: make up several marinades in advance. Put them in gallon size Ziplock bags. Go to the grocery store. Buy several packages of chicken, thighs and legs, breasts, whatever is on sale...and if it's marked down for quick sale...even better. When you get home, open up chicken packages, rinse off the meat, remove skin (or not), and then put as many pieces as it takes to feed your family into each Ziplock. Smoosh the Ziplocks around some, (or employ a three year old to help you carry them to the freezer) and pop them in the freezer. You're done. You just cooked dinner for at least 6 nights. In UNDER 30 minutes (not including shopping time). I know it's technically not "cooked" but it will be, most chicken cuts cook very fast, and truthfully, many of these cook up just great in the crock pot too! Plus, you'll be looking forward to trying your creations instead of groaning about having to come up with something for dinner. And the next time you make something, make a double batch: freeze one, serve one. With a little time and discipline, you will be eating better and cheaper than you ever thought possible and building your food storage AT THE SAME TIME!!! YEAHY!
Stay tuned for a post later this week on canning meats and soups! I have two bottles of chicken (surprise! lol), a bottle of ground beef and two quarts of chicken soup...and I took pictures and video as I went so you can join in the fun! Until then, happy storing.